
Finding the right methods to support a learner can feel like searching for a key to a specific lock. Every child, student, and client has a unique way of processing information and building new skills. That is why having a diverse toolkit of teaching methods is so important. This guide offers several practical instructional strategies examples that therapists, educators, and parents can adapt to fit their learners’ needs, whether in a classroom, therapy session, or at home. These strategies are designed to make learning more accessible, engaging, and effective for everyone.
Instructional Strategies Examples Using Multisensory Input
Multisensory instruction is a powerful technique that engages more than one sense at a time to help a learner process information. Instead of relying solely on seeing (visual) or hearing (auditory) information, this approach incorporates touch (tactile) and movement (kinesthetic) as well. The principle is simple: by creating more pathways in the brain for information to travel, you strengthen memory and improve understanding. This method is especially beneficial for learners who struggle with traditional teaching formats, but its benefits apply to everyone.

Why It Works
When a child learns a new letter by seeing it, saying its sound, and tracing it in sand, they are encoding that information in three different ways. This redundancy helps solidify the concept. It transforms abstract ideas, like letter shapes or number values, into concrete, physical experiences. This active engagement helps keep learners focused and makes the learning process more memorable and enjoyable.
Practical Examples
- For Handwriting: Have children form letters using clay, trace them on sandpaper, or write them in a shallow tray filled with salt or shaving cream. This provides valuable tactile feedback that reinforces letter formation.
- For Math: Use physical objects like blocks or beads for counting and basic arithmetic. Create number lines on the floor with tape and have the child jump from one number to another to solve addition or subtraction problems.
- For Reading: Use magnetic letters to build words on a board. As the child places each letter, have them say its sound. This connects the physical act of building the word with its auditory components.
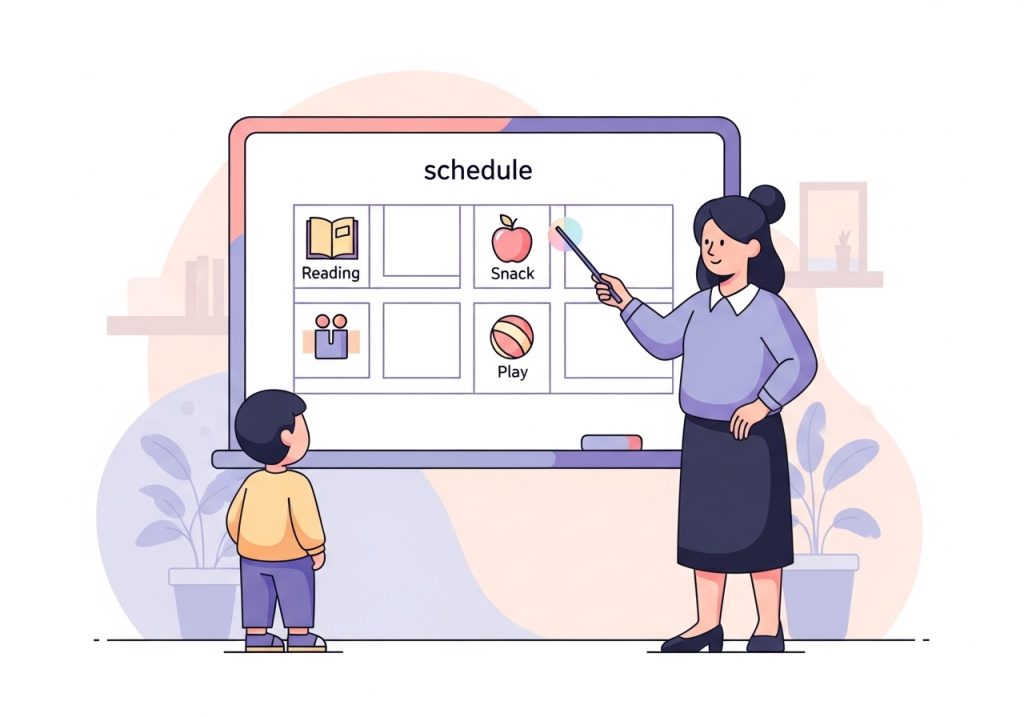
Utilize Visual Supports and Graphic Organizers
Visual supports are tools that present information graphically to help learners understand concepts, follow routines, and communicate their needs. They can range from simple picture schedules to more complex graphic organizers like flowcharts or Venn diagrams. By presenting information visually, you reduce the reliance on auditory processing and working memory, which can be challenging for many learners. These tools provide a clear, static reference that a child can return to as often as needed.
Why It Works
Visuals make abstract concepts like time and sequence concrete and predictable. A visual schedule, for example, clearly shows “what comes next,” which can significantly reduce anxiety around transitions. Graphic organizers help students structure their thoughts, see relationships between ideas, and break down large amounts of information into smaller, digestible parts. This is particularly helpful for tasks like writing a story or studying for a test.
Practical Examples
- Daily Routines: Create a simple chart with pictures or words for a morning routine (e.g., wake up, eat breakfast, brush teeth, get dressed). The child can move a magnet or check off each item as it is completed.
- Behavioral Expectations: Use a “First-Then” board to show a non-preferred task followed by a preferred one (e.g., “First homework, then play”). This clarifies expectations and can increase motivation.
- Academic Tasks: Introduce story maps (for identifying characters, setting, and plot), KWL charts (What I Know, What I Want to know, What I Learned), or mind maps for brainstorming ideas before writing.
Implement Task Analysis and Chaining
Task analysis is the process of breaking down a complex skill into a sequence of smaller, more manageable steps. Once you have the steps identified, you can teach them using a method called chaining. This instructional strategy is incredibly effective for teaching self-care skills, motor activities, and academic routines that involve multiple actions.
There are two primary types of chaining:
- Forward Chaining: You teach the first step of the sequence until the learner masters it. Then, you teach the second step, and so on, until the entire sequence is learned from beginning to end.
- Backward Chaining: You complete all the steps for the learner except the very last one. The learner completes the final step to achieve success. Once that is mastered, they complete the last two steps, and so on, working backward until they can do the whole task independently.
Why It Works
Task analysis removes the overwhelming feeling of a large, complex task. It provides a clear roadmap for the learner and the instructor. Backward chaining is often highly motivating because the learner experiences the success of completing the task right from the beginning. Both methods build confidence by allowing the learner to master one small piece at a time. This approach is similar to behavior shaping techniques, where you reinforce successive approximations of a target behavior.
Practical Examples
- Tying Shoes (Backward Chaining): You do all the steps of tying the shoe and leave the child with only the final step of pulling the loops tight. Once they can do that, you have them make one loop and pull it through, then pull tight. You continue working backward from the end.
- Washing Hands (Forward Chaining): First, teach the child to turn on the water. Once that is mastered, teach them to turn on the water and then get soap. You build the sequence from the first step to the last.
- Solving a Math Problem: Break down a multi-step word problem into individual steps: 1. Read the problem. 2. Identify the question. 3. Find the important numbers. 4. Decide on the operation (+, -, x, ÷). 5. Solve the problem. 6. Write the answer.
Apply Differentiated Instruction
Differentiated instruction is a framework for teaching that recognizes the diverse learning needs within any group. Instead of a one-size-fits-all approach, the educator proactively plans and adjusts their methods to meet learners where they are. This can involve modifying the content (what is being taught), the process (how it is being taught), or the product (how students demonstrate their learning).
Why It Works
This strategy promotes success for all learners by providing appropriate levels of challenge and support. It allows students who are ready for more complexity to deepen their understanding, while providing the necessary scaffolding for those who need more support. By offering choice and flexibility, differentiation increases student engagement and ownership of their learning. It is a fundamental part of inclusive education and is essential for ensuring learning objectives are tailored to each student.
Practical Examples
- Content: In a lesson about a historical event, provide reading materials at different complexity levels. Some students might read a simplified summary, while others read a primary source document.
- Process: Offer different ways for students to practice a skill. For spelling, one student might use magnetic letters, another might write the words with a whiteboard marker, and a third might type them.
- Product: Allow students to demonstrate their understanding in various formats. After a science unit, a student could write a report, create a diorama, record a podcast, or design a presentation.
Use Explicit Instruction (I Do, We Do, You Do)
Explicit instruction is a highly structured and direct teaching method that breaks learning into clear, manageable parts. It follows a simple and effective sequence often called the “I Do, We Do, You Do” model. This approach minimizes the chance for misunderstanding by providing clear modeling and ample guided practice before expecting independent performance.
Why It Works
This model provides a strong scaffold for learning. The “I Do” phase makes the thinking process visible to the learner, as the instructor models the skill while talking through their steps. The “We Do” phase is critical for correcting errors and building confidence in a supportive environment. Finally, the “You Do” phase allows the learner to solidify their understanding through independent practice. This gradual release of responsibility ensures that students are not asked to perform a skill until they have been thoroughly prepared.
Practical Examples
- “I Do” (Modeling): The therapist demonstrates how to hold scissors correctly and make a snip on a piece of paper, explaining each step: “My thumb goes in the top hole, and my fingers go in the bottom hole. I keep my thumb up. I open the scissors, and I close them.”
- “We Do” (Guided Practice): The therapist and child use hand-over-hand assistance or practice on a piece of paper together. The therapist provides immediate feedback and cues: “Great job keeping your thumb up! Let’s try opening a little wider this time.”
- “You Do” (Independent Practice): The child is given their own piece of paper and scissors to practice snipping independently, while the therapist observes and provides encouragement or corrective feedback as needed.
Effective teaching and therapy depend on having a robust set of strategies to draw from. The examples provided here—multisensory input, visual supports, task analysis, differentiation, and explicit instruction—are proven methods for supporting skill development in diverse learners. The key is to observe the individual in front of you and consider which approach best matches their needs for a particular task. By thoughtfully choosing the right approach for your specific situation, you can create a supportive environment where every learner has the opportunity to succeed and build confidence.
Ready to put these strategies into action? Finding the right materials shouldn’t be another challenge on your list. The Inspiring OT offers a wide range of practical, low-prep printable activities and resources designed by an experienced occupational therapist. Explore our collection of engaging tools to support fine motor, sensory, handwriting, and life skills development.
Leave a Reply