
Transitions can be challenging for young children. Moving from a preferred activity like playtime to a less-preferred one like cleaning up can lead to frustration and resistance. For educators, therapists, and parents, finding effective ways to structure a child’s day is essential for fostering cooperation and independence. A well-designed preschool visual schedule is a powerful tool that provides predictability, reduces anxiety, and empowers children by showing them what to expect next. This guide will walk you through the practical steps of creating a visual schedule that truly supports a child’s daily routine.
Step 1: Identify Key Routines and Goals
Before you begin creating a schedule, the first step is to identify which parts of the day cause the most difficulty. A visual schedule doesn’t need to map out every single minute. Instead, it should target specific routines where a child needs the most support. Observe the child to pinpoint challenging moments. Is the morning routine a constant struggle? Do transitions between different centers in the classroom create chaos? Is the bedtime sequence unpredictable?
Once you identify these “pain points,” set clear goals for what you want the schedule to achieve. Your goals might include:
- Increasing a child’s independence in getting dressed in the morning.
- Reducing tantrums during the transition from outdoor play to snack time.
- Helping a child follow the steps for handwashing without constant verbal prompts.
- Providing a clear structure for therapy sessions or homeschool lessons.
Focusing on one or two key routines at first is often more effective than trying to implement an all-day schedule immediately. Start small, build success, and then expand the schedule as the child becomes comfortable with the concept.
Step 2: Gather Your Materials
You don’t need expensive or complicated materials to create an effective visual schedule. Most of the necessary items are likely already available in a classroom, clinic, or home. Here is a simple list of what you will need:
- Paper or Cardstock: Sturdy cardstock is ideal for durability, but regular paper works too.
- A Base or Board: This could be a strip of laminated cardstock, a small whiteboard, a file folder, or even a designated space on the refrigerator or wall.
- Images: You will need clear pictures representing each activity (more on this in the next step).
- Scissors: For cutting out the picture cards.
- Laminator and Laminating Sheets (Optional): Laminating the schedule and picture cards makes them last much longer, especially with frequent handling by little hands. It also makes them easy to wipe clean. If you don’t have a laminator, you can use clear packing tape to cover the cards.
- Adhesive: Velcro dots are a popular choice because they allow children to physically move a task from the “to-do” section to the “finished” section. Magnetic tape is another great option for use on whiteboards or refrigerators.
Step 3: Select Clear and Simple Images
The success of a visual schedule depends heavily on the child’s ability to understand the pictures. The images should be simple, clear, and unambiguous. Avoid cluttered pictures with distracting backgrounds. When choosing your images, consider the child’s developmental level and preferences.
You have several options for sourcing images:
- Real Photos: Taking pictures of the actual objects or locations can be very effective, especially for children who need concrete representations. A photo of their own toothbrush, their specific lunchbox, or the school playground can be more meaningful than a generic icon.
- Simple Drawings or Clip Art: For many children, simple line drawings or basic clip art are easy to understand. Consistency is important, so try to use images from the same set or in a similar style.
- Symbol Systems: For some learners, particularly those with communication challenges, using established symbol systems like the Picture Exchange Communication System (PECS) or Boardmaker symbols can be beneficial. These systems are designed for clarity and are often used to support communication development.
Whatever type of image you choose, make sure it clearly represents the activity. A picture of a fork and plate for “lunchtime” is better than a picture of a complex meal. A simple icon of a book is perfect for “story time.”
Step 4: Design the Schedule Layout
The format of your visual schedule should match the goals you set in the first step. There is no single “correct” layout. The best design depends on the child’s needs and the routine you are supporting.
Here are a few common and effective layouts:
- Top-to-Bottom Strip: This is a simple vertical strip where activities are listed in chronological order from top to bottom. It clearly shows the sequence of events and is easy for children to follow.
- Left-to-Right Board: This format arranges the pictures horizontally, which aligns with the direction we read and write. This can be a subtle way to reinforce pre-literacy skills.
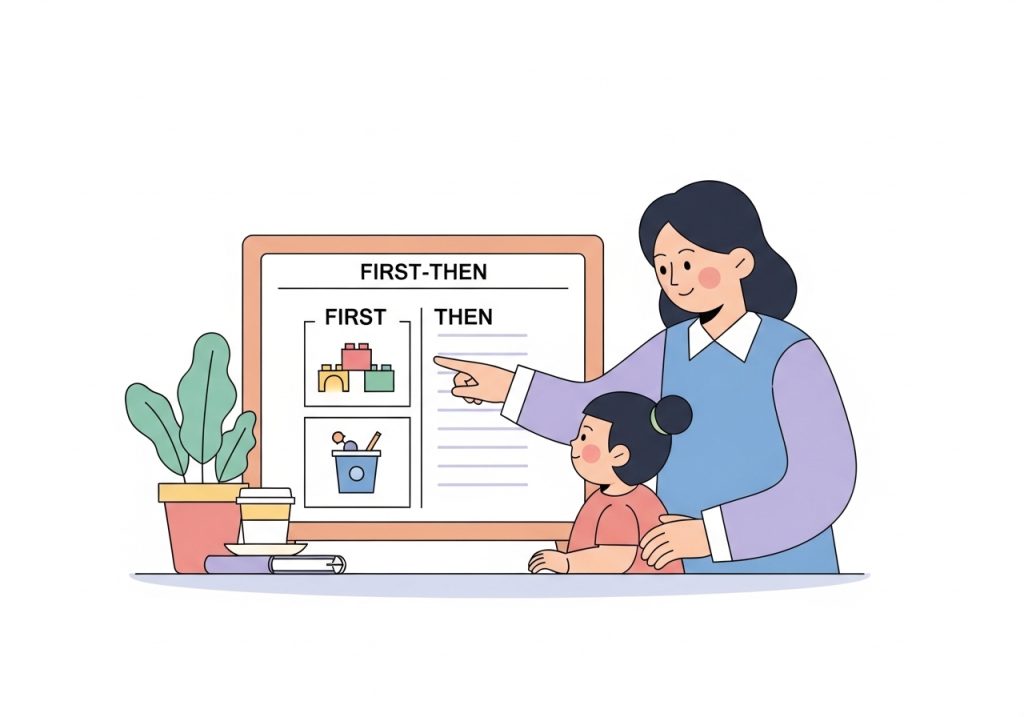
- “First-Then” Board: This is one of the simplest and most powerful layouts. It uses just two pictures: “First, we will do [non-preferred activity],” and “Then, we will do [preferred activity].” This format is excellent for motivating a child to complete a task and for managing behavior related to difficult transitions.
- Activity Binder: For more complex daily schedules, a small binder with one page per part of the day (e.g., “Morning,” “School,” “Evening”) can help organize many activities without overwhelming the child.
Consider including a “finished” column or envelope. This gives the child a place to put the picture card once the activity is complete, providing a clear sense of accomplishment and progress.
Step 5: Assemble Your Preschool Visual Schedule
With your materials gathered and your design chosen, it’s time to put it all together. Follow these steps for a clean and durable schedule:
- Print and Cut: Print your chosen images. A good size for individual cards is around 2×2 inches, but you can adjust this based on the child’s visual and motor skills. Cut out each picture card carefully.
- Laminate: Place the cards and the main schedule board into laminating pouches and run them through the laminator. This step is highly recommended for durability. Trim the excess lamination, leaving a small border to ensure the seal stays intact.
- Add Adhesive: Attach one side of your Velcro dot or magnetic tape to the back of each picture card. Place the other side onto the designated spots on your schedule board. Make sure to use the same side (e.g., the rough side) on all the cards and the other side (the soft side) on the board for consistency.
- Organize Your Cards: If you have many picture cards, consider a storage system like a small photo album or a box with dividers to keep them organized and accessible.
Step 6: Introduce and Model the Schedule
How you introduce the schedule is just as important as how you make it. Choose a calm and positive moment to show it to the child for the first time. Don’t wait until a stressful transition is already happening. Sit with the child and explain what it is in simple terms: “This is our helper schedule. It shows us what we are going to do today!”
Walk them through the process:
- Point to the first picture and say, “First, it’s time for snack.”
- When the activity is over, guide them to take the picture off the board. Say, “Snack is all done!”
- Help them move the card to the “finished” envelope or column. This physical action is very important.
- Then, point to the next picture and announce the next activity.
Your tone should be cheerful and matter-of-fact. The schedule is not a tool for punishment or a list of demands. It is a helpful guide, much like a grocery list or a calendar for an adult. Using visual supports is an excellent way to reinforce expectations and create a more predictable environment, similar to the strategies used when creating effective classroom rules.
Step 7: Be Consistent and Adapt as Needed
For a visual schedule to work, it must be used consistently. Refer to it at every transition point covered by the schedule. Make it a natural part of the routine. If you only use it sometimes, it will lose its meaning and effectiveness. Involve the child in using it by encouraging them to check the schedule and move the pieces themselves as they become more familiar with it.
At the same time, be prepared to be flexible. A visual schedule is a dynamic tool, not a rigid contract. If a planned activity changes, show the child how you are moving the pictures around. This teaches them flexibility and helps them cope with unexpected changes. For example, if it starts raining, you can say, “Oh, it’s raining! We can’t go to the park. Let’s change our schedule. Instead of the park, we will build a fort inside.”
Pay attention to what works and what doesn’t. If the child is overwhelmed by a long schedule, shorten it. If a picture is confusing, replace it. As the child grows and their skills develop, you may find they need the schedule less, or you may need to update it with more complex tasks. The goal is to provide just the right amount of support to help them succeed.
Creating a preschool visual schedule is a practical and supportive strategy for helping children navigate their day. By providing clear expectations and a predictable structure, you can reduce anxiety, foster independence, and make daily routines smoother for everyone involved. The key is to start simple, be consistent, and adapt the tool to meet the unique needs of the child you are supporting.
Ready to put these ideas into practice? If you’re looking for professionally designed, ready-to-print resources to support skill development, explore the shop at The Inspiring OT. You’ll find a wide range of practical, OT-created activities and tools to help you save time and empower your learners. Find your next great resource at The Inspiring OT on Teachers Pay Teachers.
Leave a Reply