
Handwriting remains a fundamental skill for academic success, and worksheets are a common tool for providing structured practice. For therapists, teachers, and parents, finding high-quality materials without a high cost is a priority. Many search for print handwriting worksheets pdf free downloads, hoping to find resources that can help learners improve their skills. This guide explains how to select and use these worksheets effectively to support developing writers. We will cover how to turn a simple PDF download into a meaningful practice session that builds both skills and confidence.
Step 1: Assess Learner Needs to Select the Right Worksheet
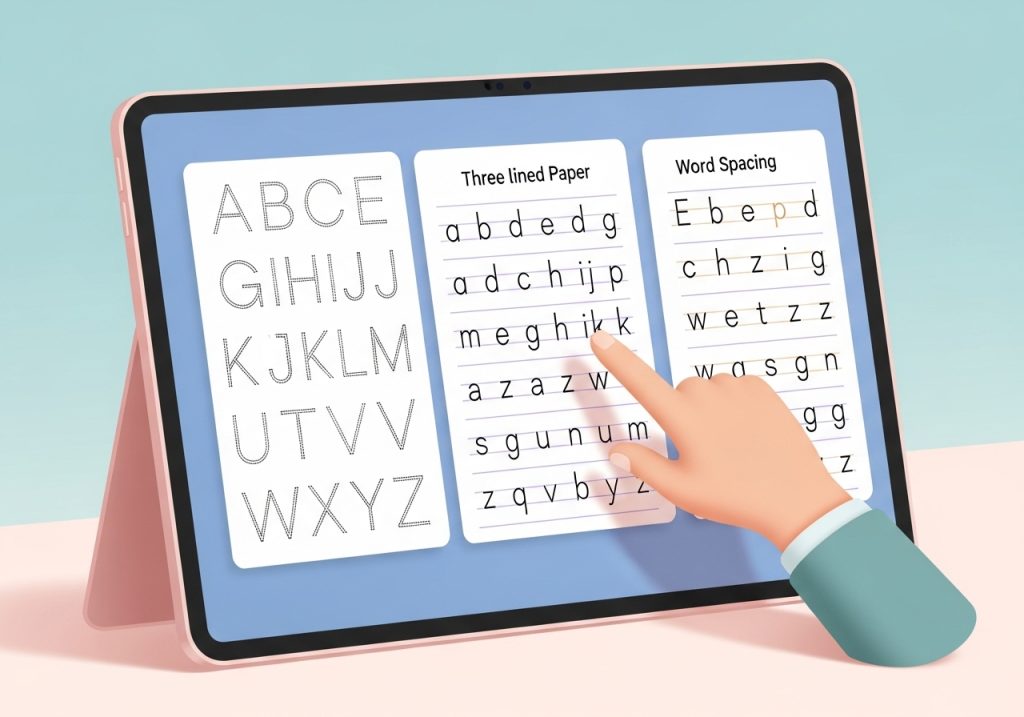
The effectiveness of a worksheet depends on how well it matches a learner’s specific needs. Before downloading any worksheet, take a moment to observe the student’s writing. A one-size-fits-all approach rarely works because handwriting challenges are unique to each individual. A careful assessment is the first step toward targeting a specific set of skills and making practice time productive. Are they struggling with forming letters correctly? Is spacing between letters and words inconsistent? Perhaps letter size or placement on the line is the primary issue. A worksheet designed for tracing foundational strokes will not be very helpful for a child who needs practice with sentence copying.
Consider these common areas of difficulty when choosing a resource:
- For Letter Formation: If a student forms letters from the bottom up or uses incorrect stroke sequences, look for worksheets with clear starting points, numbered steps for strokes, and directional arrows. These visual cues provide a model to re-learn motor patterns.
- For Sizing and Placement: For learners whose letters float above the baseline or vary wildly in size, worksheets with clearly defined lines (top, middle, baseline) are essential. Some students may benefit from highlighted or color-coded lines to provide stronger visual boundaries.
- For Spacing: Spacing issues can occur between letters (making words hard to read) or between words (making sentences run together). Seek out activities that involve copying words and sentences, which requires attention to spacing. Using a small spacer tool or a finger can also help establish consistency.
By identifying the primary challenge, you can select a worksheet that provides targeted practice exactly where it is needed most.
Step 2: Prepare the Learning Environment and Materials
A conducive learning environment can make a significant difference in the quality of handwriting practice. Before the student even picks up a pencil, ensure the physical setup supports their success. This involves paying attention to posture, lighting, and tools. Proper ergonomic support reduces fatigue and allows for better fine motor control.
Ensure the student is seated at a desk or table of the appropriate height, with their feet flat on the floor and hips, knees, and ankles at roughly 90-degree angles. Good posture supports the arm and hand control needed for writing. The desk surface should be about two inches above their bent elbow. Lighting should be adequate to prevent eye strain, coming from a source that doesn’t cast a shadow over their work. Have a few well-sharpened pencils and a good eraser on hand. For some students, using a pencil grip or a slant board can provide extra support and improve endurance for the task. Removing distractions from the workspace can also help the learner focus on the handwriting activity.
Step 3: Guide the Practice with Clear Instructions
Handing a child a worksheet without guidance is a missed opportunity for instruction. Active involvement transforms a simple task into a learning experience. Begin by demonstrating how to form one or two of the letters on the page yourself. Talk through the steps as you write, modeling both the physical movements and the thought process. Use simple, consistent verbal cues like “start at the top,” “big line down,” or “magic C” to describe the strokes. This verbal feedback helps cement the motor plan.
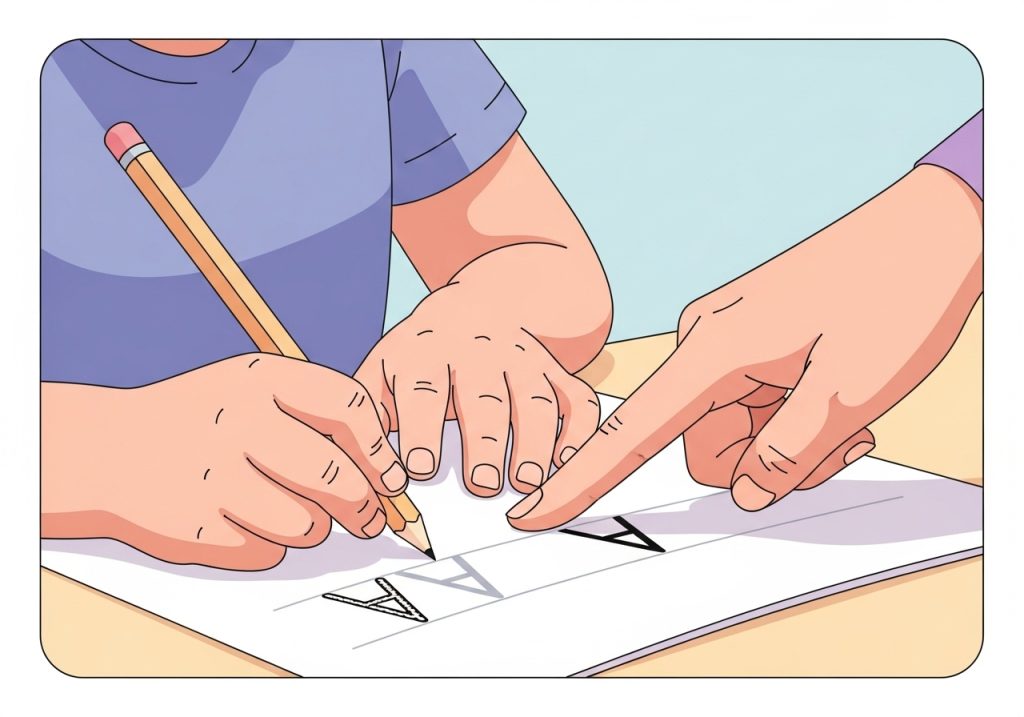
Encourage the learner to focus on forming one row of letters correctly rather than rushing to fill the entire sheet. Quality of practice is more important than quantity. You can cover up parts of the worksheet with a blank sheet of paper to help the student focus on one line at a time, which can reduce visual clutter and feelings of being overwhelmed. Check for correct pencil grasp and provide gentle reminders as needed. The goal is to build good habits through mindful repetition, not just to complete an assignment.
Step 4: Provide Constructive and Positive Feedback
Feedback helps learners understand what they are doing well and what needs more practice. How we deliver this feedback can greatly impact a child’s motivation and self-esteem. After the session, review the worksheet together in a positive and collaborative manner. Start by pointing out their best-formed letter or word. You could say, “I really like how you closed the circle on this ‘a’,” or “Look how neatly this word sits on the line.” This positive reinforcement builds confidence and shows them they are capable of success.
Then, you can gently identify one specific area for improvement. Avoid vague comments like “be neater.” Instead, be specific. For instance, “Next time, let’s try to make our tall letters like ‘h’ and ‘l’ touch the top line.” This approach is encouraging and provides a clear, achievable goal for the next practice session. Frame it as a team effort, working together to make their writing easier to read. This helps the learner see feedback as helpful guidance rather than criticism.
Step 5: Integrate Worksheets into a Multi-Sensory Approach
Handwriting worksheets are just one tool in the toolkit. To reinforce motor learning and keep students engaged, combine worksheet practice with multi-sensory activities. This approach helps solidify the motor patterns for letter formation by involving different senses. It also makes practice more enjoyable, which is key for sustained effort. You can also explore using theme worksheets to make practice more engaging and fun.
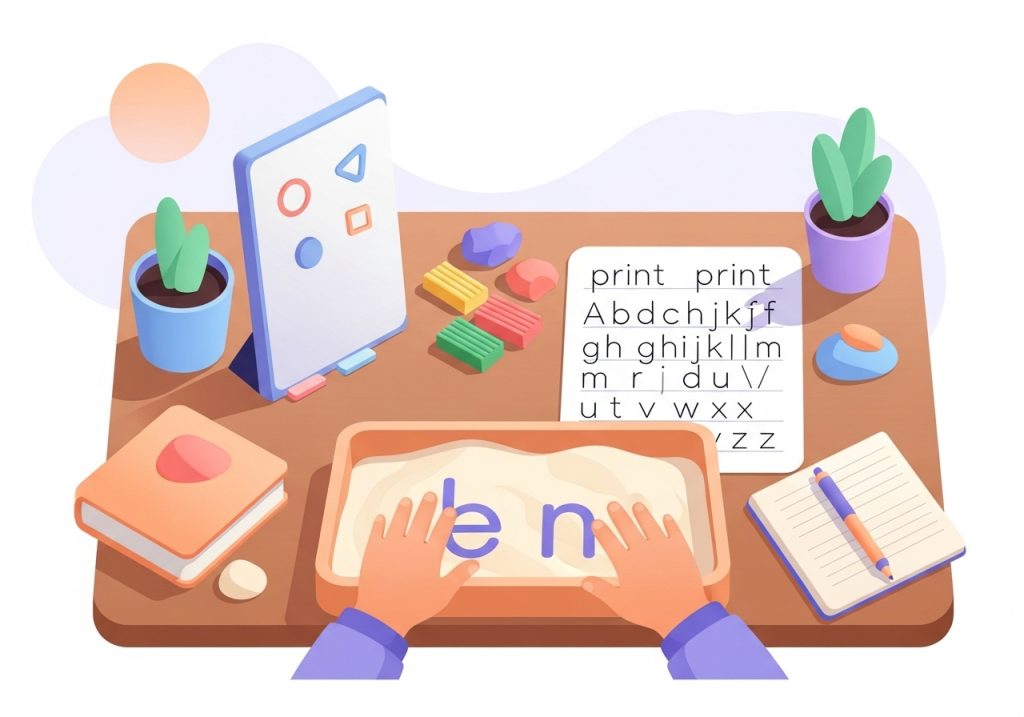
Before starting a worksheet, a child could warm up by practicing letters in a more tactile way. Some effective multi-sensory ideas include:
- Writing letters in a shallow tray filled with sand, salt, or shaving cream.
- Forming letters out of modeling clay or dough.
- Using a wet paintbrush on a chalkboard or sidewalk to “paint” letters.
- Practicing on a vertical surface, like an easel or whiteboard, which helps develop wrist extension and shoulder stability.
Using worksheets in conjunction with these activities creates a well-rounded practice that addresses different learning pathways and keeps students motivated.
By following these steps, you can transform a simple worksheet into a powerful instructional tool. Thoughtful selection, a prepared environment, clear guidance, and positive feedback are key to helping learners build the foundational handwriting skills they need. A free PDF can be a valuable resource when it is used as part of a strategic and supportive approach to skill development.
Ready to put these strategies into action? Finding the right materials can make all the difference. For professionally designed, evidence-informed activities that support fine motor, visual motor, and handwriting skills, explore the resources at The Inspiring OT shop. Discover practical, low-prep printables created by an experienced occupational therapist to help every learner succeed.
Leave a Reply