
Meeting the diverse needs of every learner in a classroom, therapy session, or homeschool environment can feel like a significant challenge. Students come with unique strengths, abilities, and areas for growth. This is where differentiated instruction becomes an essential part of our practice. Instead of a one-size-fits-all approach, differentiation involves making thoughtful adjustments to what students learn, how they learn it, and how they show what they know. This post provides practical differentiated instruction examples that you, as an occupational therapist, teacher, or parent, can adapt and use immediately to support skill development in a meaningful way.
Use Tiered Assignments for Handwriting Practice
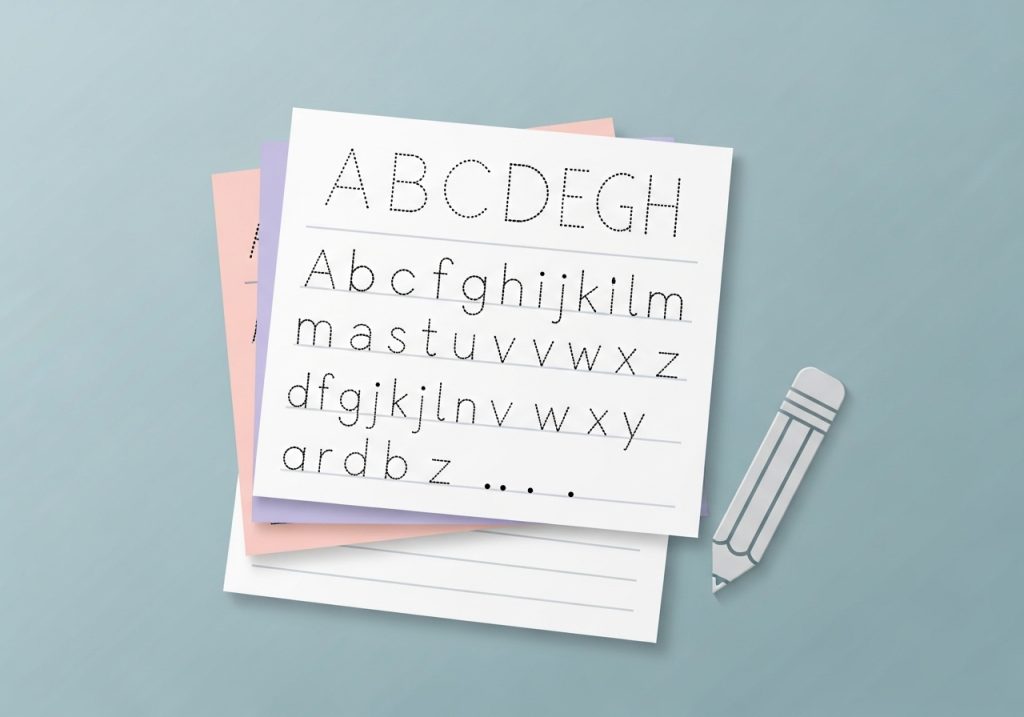
Tiered assignments are a powerful strategy for ensuring every student works on the same core skill at an appropriate level of challenge. The goal is to match the complexity of the task to a student’s readiness. For handwriting, this means you can have all learners practicing letter formation, but the support they receive will vary. This approach prevents frustration for students who need more help and avoids boredom for those ready for a greater challenge.
Instead of giving everyone the same worksheet, you can create a few versions. According to research, teachers can differentiate instruction through content, process, and product, and tiered assignments are a great example of modifying the process and content. For example, a tiered handwriting activity might include:
- Tier 1 (Most Support): This worksheet could feature large, bold letters with clear start and stop points. It might include traceable letter paths or raised lines to provide tactile feedback. The focus is on mastering the motor plan for each letter with maximum guidance.
- Tier 2 (Moderate Support): This version might offer a starting dot for each letter and a model to copy, but no traceable lines. The letter size might be smaller, requiring more refined motor control.
- Tier 3 (Least Support): For students who have mastered basic letter formation, this worksheet could provide only lined paper. They might be asked to write letters from memory or copy words and sentences, focusing on size, spacing, and alignment.
By using tiered assignments, you ensure that every child is engaged in productive practice. It’s one of the most effective strategies to improve on handwriting because it respects each learner’s developmental stage while moving them toward the same learning goal.
Implement Choice Boards for Sensory or Movement Breaks
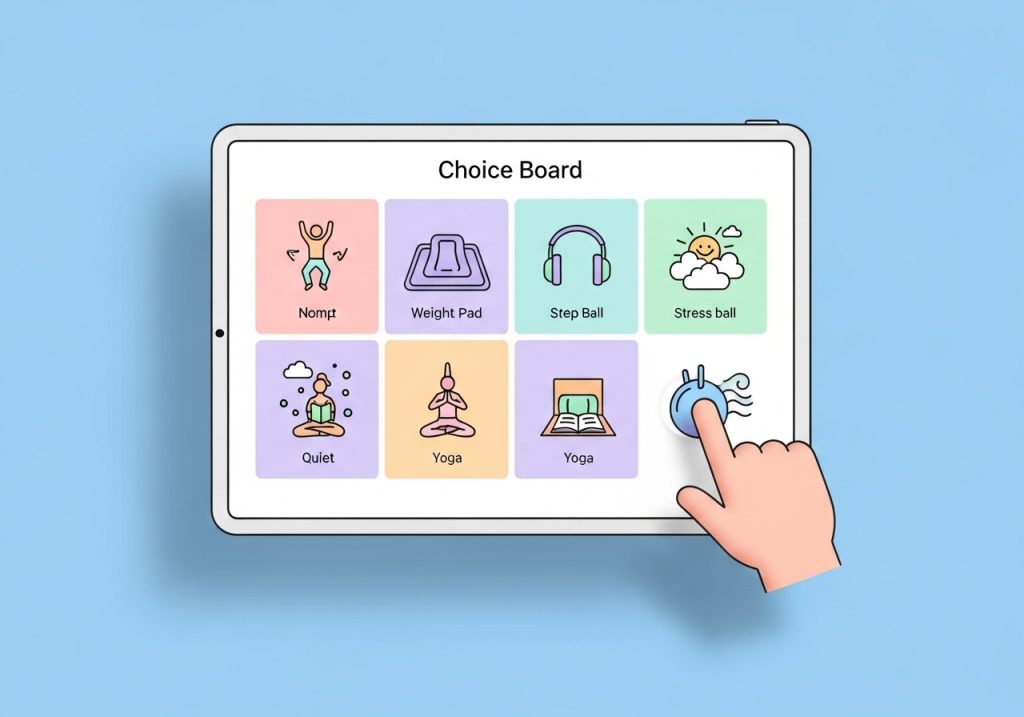
Self-regulation is a critical skill for learning, and many students benefit from structured sensory or movement breaks throughout the day. A choice board is an excellent tool for differentiating these breaks. It provides students with a curated set of pre-approved activities, giving them a sense of control and helping them learn to identify and respond to their own sensory needs. This strategy promotes autonomy and is far more effective than assigning the same break activity to everyone.
Creating a sensory choice board is simple. Use a grid format with pictures or words representing different activities. A student can then point to or select the option that feels right for them at that moment. This is a practical way to help a child build a supportive sensory diet tailored to their unique profile. Some examples of activities to include are:
- Calming Activities: Listening to quiet music with headphones, sitting in a beanbag chair, doing deep breathing exercises, or using a weighted lap pad.
- Alerting Activities: Doing wall push-ups, jumping on a mini-trampoline, eating a crunchy snack, or stretching with resistance bands.
- Just-Right Activities: Squeezing therapy putty, carrying a box of books to the library, or rocking gently in a rocking chair.
As noted by educational resources like Prodigy, giving students choices increases engagement and ownership of their learning. Choice boards apply this principle to regulation, which is the foundation for all other learning.
Create Flexible Grouping for Fine Motor Stations
Flexible grouping involves organizing students into small, temporary groups to work on specific skills. Unlike static groups that remain the same for weeks, these groups change frequently based on formative assessment and immediate learning needs. This is a highly effective way to provide targeted instruction in areas like fine motor skills, where progress can vary widely among students.
You can set up several stations around the room, each focused on a different fine motor task. Then, you can group students based on the skill they need to practice most. This allows you to work closely with a small group on a specific challenge while other students work independently or with peers at other stations. The groups are fluid; a student might work on scissor skills one day and pincer grasp the next.
Examples of fine motor stations could include:
- Cutting Station: Practice cutting along lines of increasing complexity (straight, curved, zig-zag).
- Fastener Station: Work on buttoning, zipping, and snapping on a dressing frame or doll clothes.
- Manipulation Station: Use tongs or tweezers to sort small items like beads or pom-poms into containers.
- Construction Station: Build with small interlocking blocks or thread beads onto a string.
This approach allows for differentiation by task and by grouping. It ensures that instruction is always relevant and targeted, helping students build skills more efficiently.
Provide Varied Scaffolding for Multi-Step Tasks
Many academic and life skills tasks involve multiple steps, which can be challenging for students developing their executive functioning skills like planning, sequencing, and working memory. Scaffolding involves providing temporary support to help a student complete a task they couldn’t do independently. Differentiating this support is key, as some students may need a detailed roadmap while others only need a gentle prompt.
The type of scaffolding can be tailored to individual needs. The goal is to provide just enough help to ensure success without creating dependence, gradually fading the support as the student gains proficiency. According to experts like Carol Ann Tomlinson, differentiating the “process” of learning is a core component of this instructional framework, and scaffolding is a prime example of this in action. For a multi-step craft project, for example, you could offer:
- Visual Schedules: A step-by-step picture guide showing each part of the process. For some learners, using a simple visual schedule is the most effective way to break down a task.
- Written Checklists: A simple list of steps for students who can read. They can check off each step as they complete it.
- Verbal Prompts: Offering one-step directions at a time or providing reminders as needed.
- Peer Support: Pairing a student with a peer who can model the steps and offer assistance.
This method ensures that all students can access the activity and experience success, building their confidence and independence over time.
Offer Multiple Ways to Demonstrate Skill Mastery
Just as students learn in different ways, they also have different strengths when it comes to showing what they know. Differentiating the “product” means allowing students to demonstrate their mastery of a skill in a format that works for them. This moves beyond traditional pen-and-paper tests and acknowledges that writing is not the only way to express understanding. This approach is more equitable and can give you a more accurate picture of a student’s abilities.
For example, after a unit on tying shoes, instead of a single assessment, you could offer students several options to show they have mastered the skill. Providing these alternatives is a key aspect of a differentiated classroom, as outlined in guides for educators. A student could choose to:
- Give a live demonstration: Tie a shoe for the teacher or therapist.
- Create a video tutorial: Record themselves explaining and showing the steps.
- Draw a diagram: Illustrate the steps of the shoe-tying process in a sequence of pictures.
- Verbally explain the process: Talk through the steps with a peer or adult, who can document their explanation.
This strategy empowers students by allowing them to use their strengths. A child with strong verbal skills but weak fine motor skills can still demonstrate their cognitive understanding of the process, while a visual learner can draw their way to success.
Adapt Materials for Visual-Motor Integration
Visual-motor integration, the ability to coordinate visual information with motor movements, is fundamental for tasks like writing, drawing, and copying. Students develop this skill at different rates, so adapting materials is a crucial differentiation strategy. Simple modifications can make a task accessible and appropriately challenging for a wide range of learners.
The idea is to adjust the materials to reduce unnecessary visual or motor demands, allowing the student to focus on the core skill. These modifications help support crucial visual skills and build a strong foundation for more complex tasks. Research from the National Center for Biotechnology Information supports using “modified content” to help diverse learners succeed. Examples include:
- Highlighting Boundaries: Using a highlighter to outline the space where a student should write or color.
- Using Raised-Line Paper: Providing tactile cues for staying on the line when writing.
- Creating Dot-to-Dot Guides: For a shape-copying task, one student might copy a shape from a model, while another connects dots to form the same shape.
- Providing Templates or Stencils: Offering stencils for tracing can help a student learn the motor plan for a shape before drawing it independently.
These small adaptations can make a significant difference, reducing frustration and enabling students to build their visual-motor skills with confidence.
Differentiated instruction is not about creating dozens of unique lesson plans. It is about being responsive to your learners. By making thoughtful adjustments to content, process, products, and the learning environment, you can create a more inclusive and effective experience for everyone. These differentiated instruction examples provide a starting point for thinking creatively about how to meet each student exactly where they are and help them achieve their goals.
Ready to implement these strategies with engaging, low-prep materials? The Inspiring OT offers a wide range of printable activities, worksheets, and guides designed by an experienced occupational therapist to support skill building. From fine motor practice to sensory regulation tools, you’ll find practical resources to help every learner succeed. Explore The Inspiring OT shop today and discover tools that simplify your planning and enhance student growth.
Leave a Reply