
To teach a learner how to write in cursive, follow a systematic process that begins with mastering foundational strokes, grouping letters by motor pattern, and practicing connections to form fluid words. While keyboarding is common, cursive writing remains a valuable skill that supports fine motor development, reinforces literacy, and improves writing speed. For occupational therapists, teachers, and parents, guiding a learner through this process can be a rewarding experience. This guide provides a structured, evidence-informed approach to teaching cursive handwriting effectively.
Step 1: Prepare the Learner and the Workspace
A proper setup is essential for successful handwriting instruction. Before a learner even picks up a pencil, ensuring they are comfortable and have the right tools can prevent bad habits from forming. An organized environment minimizes distractions and supports correct posture, which is fundamental to the physical act of writing. Before a learner can master the loops and curves of cursive, they need a solid foundation. Strong foundational abilities are key, and there are many ways to help improve fine motor skills in preschoolers and older children, which directly supports handwriting readiness.
Consider these key elements for an optimal learning environment:
- Proper Posture and Seating: The learner should sit in a chair that allows their feet to be flat on the floor. Their back should be straight, and they should be able to rest their non-writing hand on the desk for support.
- Paper Position: The paper should be angled slightly. For right-handed writers, the top right corner should be angled up; for left-handed writers, the top left corner should be angled up. This allows the writer to see their work and promotes a more natural arm movement.
- Appropriate Writing Tools: A sharpened pencil with a good eraser is often the best starting tool. It provides tactile feedback and allows for easy corrections. Smooth-flowing pens can be introduced once the learner has developed basic control.
- Specialized Paper: Begin with wide-ruled paper that has a dotted midline. This provides clear visual cues for letter height and placement, which is especially important for cursive as letters must be uniform in size to connect properly.
Step 2: Master Foundational Cursive Strokes
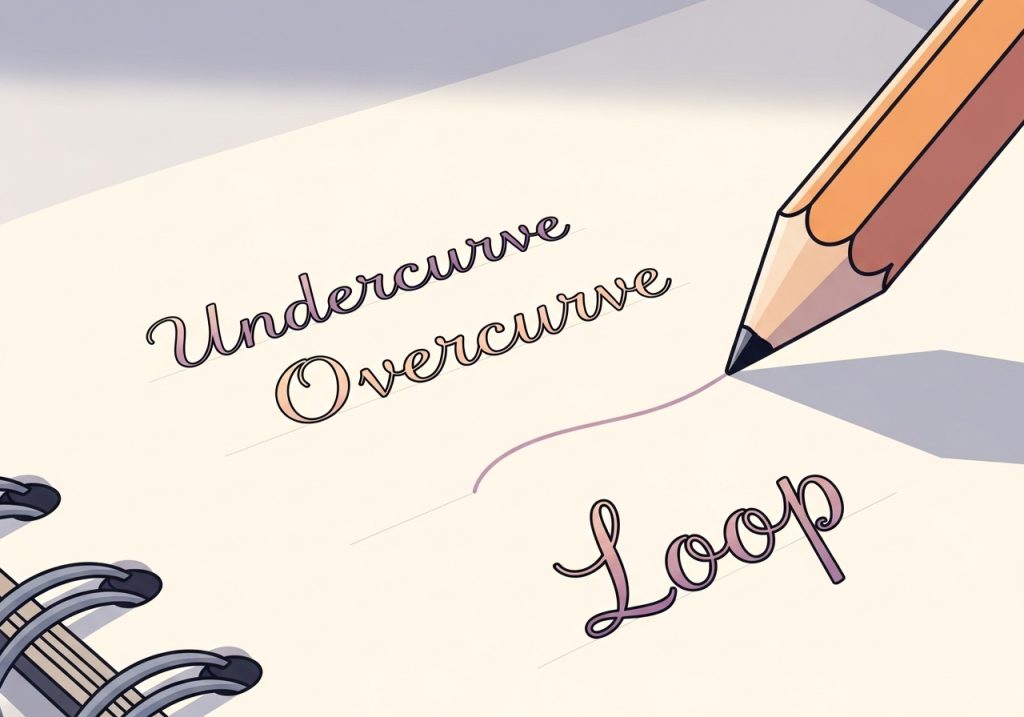
Cursive is built on a series of basic, repeatable movements. Instead of jumping straight to the alphabet, start by teaching these foundational strokes. Practicing these simple shapes helps build muscle memory and develops the fluid motions required for connected writing. Consistent practice with these core movements is fundamental for improving a child’s handwriting in any style, as it trains the small muscles in the hand.
Introduce and practice these primary strokes through repetition:
- Undercurve: A smiling stroke that starts at the baseline, curves up to the midline, and comes back down (e.g., the beginning of the letter ‘u’).
- Overcurve: A frowning stroke that starts at the midline and curves over, like a small hill (e.g., the beginning of the letter ‘n’).
- Up-and-Down Stroke: A straight line that goes from the baseline to the top line and back down, like in the letter ‘t’.
- Loops: Both ascending loops (like in ‘l’ or ‘h’) and descending loops (like in ‘g’ or ‘j’) should be practiced to master control and size consistency.
Step 3: Learn Lowercase Letters in Motor Groups
Once the foundational strokes are familiar, introduce the lowercase alphabet. Rather than teaching letters in alphabetical order, it is more effective to group them by their initial motor pattern. This approach reinforces the foundational strokes and helps learners see the similarities in letter formation. According to guidance from handwriting experts, starting with lowercase letters first is a highly effective strategy because they appear most frequently in text.
Organize letter instruction into the following groups:
- Undercurve Letters (Wave or Smile Strokes): These letters begin with the undercurve stroke. Grouping them helps master this common connector. Examples include: i, t, u, w, r, s, j, p.
- Overcurve Letters (Hill Strokes): These letters start with the overcurve motion. Practice these together to build consistency. Examples include: n, m, v, x, y, z.
- Loop Letters: These letters involve either an ascending or descending loop, requiring good spatial awareness. Examples include: e, l, h, k, b, f, g, j, y, z, q.
- Curve Letters (C-Shape Strokes): These letters start with a curve similar to the printed letter ‘c’. Examples include: c, a, d, g, q, o.
Step 4: Introduce Uppercase Letter Formation
After a learner has gained confidence with lowercase letters, you can introduce the uppercase alphabet. It is important to teach that many capital cursive letters do not connect to the following lowercase letter. This is a key difference from the fully connected lowercase script. Because of this, uppercase letters can be taught as individual forms. A visual cursive letter writing guide can be a helpful resource to show the specific pen strokes for each uppercase letter. Practice them one by one, focusing on correct formation, height, and slant before asking the learner to use them at the beginning of names or sentences.
Step 5: Understand How to Write i n Cursive by Connecting Letters
The defining characteristic of cursive is the connection between letters. This is where the practice with foundational strokes pays off. Teach learners how to use the exit stroke of one letter to form the entry stroke of the next without lifting their pencil. This fluid motion is what makes cursive an efficient form of writing.
Start with simple, two-letter combinations that use a basic undercurve connection, such as ‘in,’ ‘at,’ ‘it,’ or ‘am.’ Gradually progress to three-letter words like ‘cat,’ ‘sun,’ or ‘pin.’ Emphasize maintaining a consistent flow and rhythm. The goal is not speed but smoothness. As learners practice, they will begin to develop the motor control needed for longer words and more complex connections.

Step 6: Build Fluency with Sentences and Paragraphs
The final step is to transition from writing single words to complete sentences and eventually short paragraphs. This stage focuses on building fluency, legibility, and endurance. As learners write longer passages, they must pay attention to spacing between words, consistent letter slant, and uniform size. This stage requires significant hand-eye coordination practice to ensure the final product is neat and easy to read.
Encourage practice through meaningful activities:
- Copying Work: Have the learner copy short poems, interesting quotes, or passages from a favorite book.
- Journaling: Encourage daily journal entries to practice forming their own thoughts in cursive.
- Letter Writing: Writing letters to friends or family is a motivating way to practice real-world application.
Learning how to write in cursive is a developmental process that enhances motor skills and cognitive processing. By following these structured steps, educators, therapists, and parents can effectively guide learners toward mastering this valuable skill. Patience, positive reinforcement, and consistent practice are the keys to building confident, legible cursive writers.
Ready to support your learners with engaging, ready-to-use materials? Explore The Inspiring OT’s collection of printable activities and guides. Designed by an experienced occupational therapist, our resources help build essential skills in handwriting, fine motor control, and more. Visit our shop to find practical tools that make skill development successful and fun.
“`
Leave a Reply