
Teaching a learner how to write in cursive writing involves a systematic approach that begins with mastering foundational strokes and progresses to connecting letters fluently. This method builds on fundamental motor skills to develop legible, efficient handwriting. While some view cursive as an outdated skill, it offers significant developmental benefits, including improved fine motor control, better hand-eye coordination, and enhanced neural connections from the continuous flow of writing.
For therapists, teachers, and parents, guiding a student through this process can feel complex. This guide breaks down the instruction into clear, manageable steps based on occupational therapy principles. We will cover everything from initial setup to refining the final details, providing a structured path to help any learner succeed.
What You Need to Get Started
Before you begin teaching cursive, it’s helpful to have the right materials and ensure the learner has some prerequisite skills. A solid foundation makes the learning process smoother and more effective.
- Writing Tools: A standard No. 2 pencil is ideal for beginners because it provides good feedback and can be easily erased. Avoid pens or mechanical pencils until the learner develops confidence and control.
- Paper: Use wide-ruled or specialized handwriting paper with dotted midlines. These lines provide essential visual cues for letter size and placement.
- Prerequisite Skills: The learner should be able to form print letters with reasonable accuracy. They should also possess adequate foundational fine motor skills to hold and control a pencil for short periods.
Step 1: Establish Proper Posture and Pencil Grip
The first step in any handwriting instruction is to ensure the learner has a stable and functional base of support. Proper posture and an efficient pencil grip are critical for endurance, comfort, and motor control. Without this foundation, a learner may experience fatigue and struggle with the fluid movements required for cursive.
Check for the following points:
- Seating: The learner should sit in a chair that allows their feet to be flat on the floor. Their hips, knees, and ankles should be at approximately 90-degree angles.
- Desk Height: The desk or table should be about two inches above their bent elbow, allowing their forearms to rest comfortably on the surface.
- Pencil Grasp: Encourage a dynamic tripod or quadrupod grasp, where the pencil is held by the thumb and index finger and rests on the middle finger. This allows for precise finger movements. If the learner struggles, consider using a pencil grip as a temporary support.
- Paper Position: The paper should be slanted to match the angle of the writing forearm. For right-handed writers, the top right corner of the paper should be angled up. For left-handed writers, the top left corner should be angled up.
Correcting these elements early can prevent bad habits and is a key part of how to improve overall handwriting, not just cursive.
Step 2: Master the Basic Cursive Strokes
Cursive writing is built upon a small set of foundational strokes. Instead of teaching letters in alphabetical order, begin by practicing these core movements. This approach helps the brain learn the motor patterns required for smooth, connected writing. Consistent practice with these strokes develops muscle memory and automaticity.
The primary cursive strokes include:
- The Undercurve: Starts at the baseline, curves up to the midline, and comes back down (e.g., the start of letters like i, t, u).
- The Overcurve: Starts at the baseline, traces up, and rolls over at the top (e.g., the start of letters like m, n, v).
- The Downcurve: Starts at the midline and curves down and to the left to the baseline (e.g., the start of letters like a, d, g).
- Loops: Both ascending loops (for letters like l, h, b) and descending loops (for letters like g, j, y).
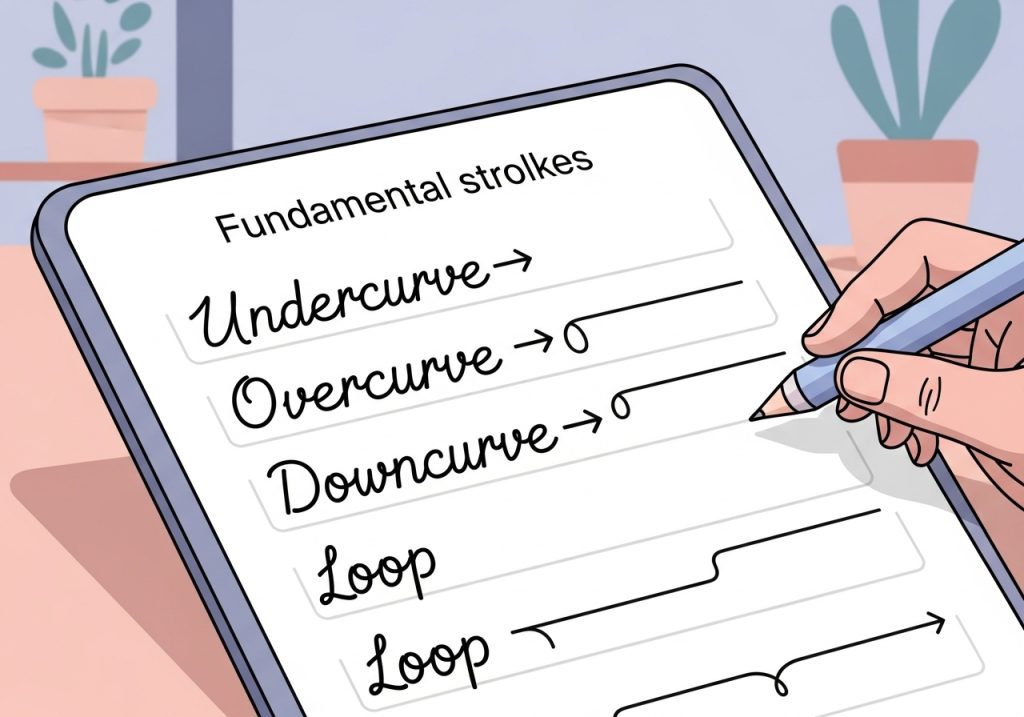
Dedicate sessions to practicing rows of these strokes. Encourage “air writing” or tracing them on a sensory surface like a sand tray to help internalize the movements before putting pencil to paper. The goal is to make these movements fluid and automatic.
Step 3: Practice Lowercase Letters in Groups
Once the basic strokes are familiar, introduce lowercase letters. Grouping letters by their initial stroke makes learning more efficient. This method, often used in programs like Handwriting Without Tears, reinforces motor patterns and helps learners see the similarities between letters. It prevents the cognitive overload of learning 26 unique formations.
A common order for teaching cursive letters is based on motor patterns:
- Undercurve Letters: Begin with letters that start with an undercurve stroke, such as i, u, w, t, r, s.
- Downcurve Letters: Move to letters that start with a downcurve, like c, a, d, g, o, q.
- Overcurve Letters: Practice letters that begin with an overcurve, including n, m, v, x, y, z.
- Loop Letters: Finally, work on letters with ascending and descending loops, such as e, l, h, k, b, f, j, p.
Focus on mastering one group before moving to the next. Use worksheets with traceable letters and then provide space for independent practice.
Step 4: Connect the Letters to Form Words
The defining characteristic of cursive is the connection between letters. After a learner can form individual lowercase letters correctly, the next step is teaching them how to link them together to write words. This is where the fluidity of cursive writing becomes apparent.
Start with simple two-letter and three-letter words using letters the learner has already mastered. For example, if they have learned the undercurve and downcurve letters, you can practice words like “it,” “cat,” “is,” and “at.”
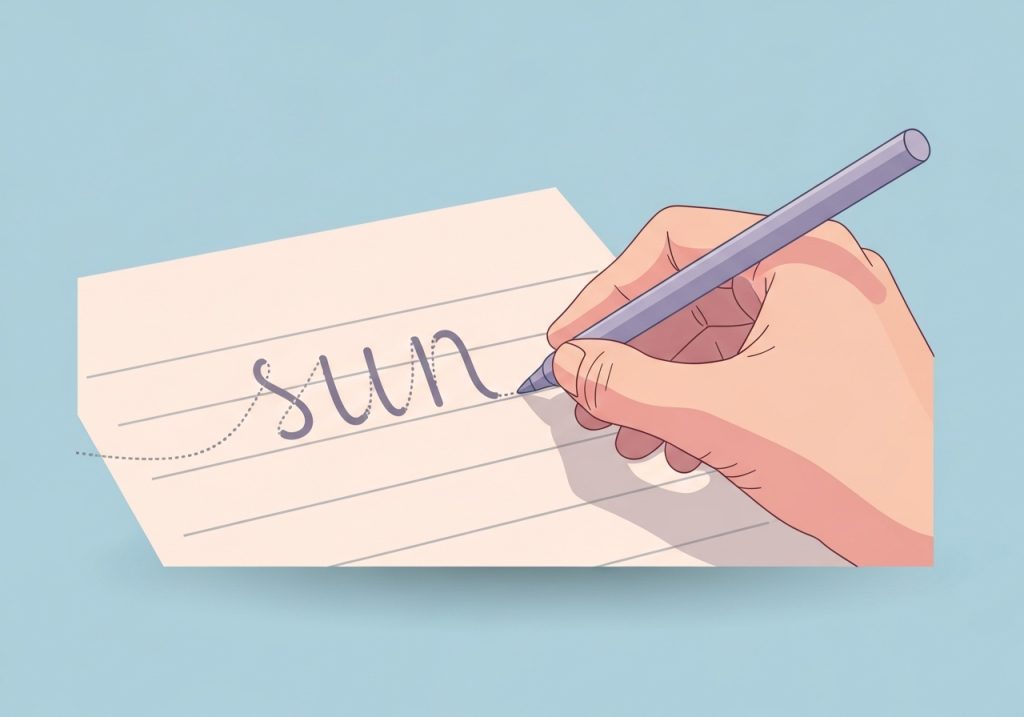
Emphasize that the pencil should not lift from the paper until the entire word is complete (except for dotting ‘i’s and ‘j’s and crossing ‘t’s and ‘x’s). The end stroke of one letter becomes the beginning stroke of the next. This continuous movement is a key component of how to write in cursive writing efficiently.
Step 5: Introduce and Practice Uppercase Letters
Uppercase cursive letters are often more ornate and do not always connect to the following letter. For this reason, it is generally recommended to teach them after the learner has a solid grasp of lowercase connections. Introduce uppercase letters one at a time, perhaps grouping them by similar shapes or strokes if possible.
Provide practice with writing names, the beginning of sentences, and proper nouns. This gives the instruction a functional context. Show the learner which uppercase letters connect to the next letter (like F, L, O, T) and which do not (like D, P, V). Use a reliable cursive alphabet guide to ensure you are teaching standard formations.
Step 6: Refine Spacing, Slant, and Legibility
With all the letters and connections learned, the final phase focuses on improving overall legibility. This involves paying attention to the finer details of handwriting that can make a significant difference in readability.
Work on the following aspects:
- Spacing: Ensure there is consistent spacing between letters within a word and between words in a sentence. A good rule of thumb is that a lowercase ‘o’ should fit between words.
- Slant: Cursive letters should have a consistent, uniform slant to the right. Using slanted grid paper can provide a helpful visual guide.
- Size and Alignment: Letters should be a consistent size and rest on the baseline. Midline letters (a, c, e) should reach the midline, and tall letters (b, d, h) should reach the top line.
Regular practice copying sentences and short paragraphs helps integrate all these skills. Provide gentle, specific feedback, focusing on one or two areas for improvement at a time to avoid overwhelming the learner.
Teaching cursive is a valuable process that reinforces many essential skills beyond just writing. By breaking down the instruction into these structured steps, you can guide learners toward developing a legible, fluid, and automatic handwriting style. Remember that patience and consistent, positive reinforcement are key to building confidence and mastering this lifelong skill.
Support Skill Development with Ready-to-Use Resources
Planning effective, engaging activities takes time. If you’re looking for practical, OT-designed materials to support learners, The Inspiring OT has you covered. Our shop offers a wide range of printable worksheets, activities, and guides that simplify skill-building for therapists, educators, and parents.
Explore our collection of low-prep resources designed to reinforce fine motor, visual motor, and handwriting skills in a fun and accessible way. Visit The Inspiring OT shop today to find the tools you need to help your learners succeed.
Leave a Reply